


An interesting moment unfurled within the media pen as qualifying for the British Grand Prix entered its dying stages. After his media obligations, Q2 eliminee Isack Hadjar stayed behind to watch the final moments in a thrilling shootout for pole.
Oscar Piastri sat atop the perch after his final run, albeit having set the pace in his first Q3 lap, but had been unable to better his first effort after a slide out of Club. Lando Norris improved but couldn’t topple his team-mate – but Hadjar’s attention was not on the McLarens – his gaze was firmly fixed on Lewis Hamilton’s final effort.
A hero of Hadjar’s during the Frenchman’s formative years, Hamilton had scorched to a then-purple first sector time and was looking good for an impressive result, but bowled a wide at Club to cost himself a hatful of time. The chance of a surprise pole went begging, and Hadjar looked visibly disappointed when the Ferrari driver crossed the line with a missing tenth, and exited stage left.
What Hadjar then missed was his Red Bull stablemate Max Verstappen making magic at the wheel of his RB21. Citing that it was difficult to handle after the opening run, where he’d fallen short by over a quarter of a second to Piastri’s initial time, Verstappen had evidently managed to tame his oft-bucking bronco and charged to a pair of mighty opening sectors – although lost time in the final one to make the gap appear slightly smaller.
How did Verstappen find the time? Did Piastri have anything left in the tank on his final lap? Did Hamilton’s miscue really cost a shot at pole? Let’s comb through the data, starting with the best laps of Verstappen and Piastri.
Sector 1: Variance in Red Bull and McLaren set-ups, 0.122s Verstappen advantage
The Red Bull’s superior straightline speed can be seen in the opening sector
Both Red Bull and McLaren took very different approaches to ultimate aerodynamic load for the British Grand Prix weekend; Red Bull trimmed out its rear wing to gather more straightline speed, while McLaren tacked on the load to pose more of a threat in the medium-to-low speed corners.
The effect of this can be seen immediately between Verstappen’s final Q3 lap and Piastri’s fastest tour of the final qualifying stage, as he cracks open a 0.12s advantage simply through the greater speed through Turns 1 and 2. Per the delta chart, you can see Verstappen’s gap grow through the corner, but this falls away again – this is likely simply due to the line through Turns 3, 4, and 5; Piastri carries more minimum speed and traction on the exit out of the Loop and ultimately pulls about 0.03s back.
But Verstappen’s straightline speed advantage began to snowball again along the Wellington Straight; at about 240km/h, Verstappen’s acceleration starts to ensure he’s moving faster than Piastri along the run to Brooklands.
McLaren opted for stability, and this is visible in the throttle traces; Piastri can wind on the throttle pedal and gather the initial tractive force out of the corners, while Verstappen had to lift on the exit from the Loop just to settle the rear briefly. This didn’t hurt him much, but this is more of an indicator of the high-wire act that the Dutchman had to perform.
Sector 2: Verstappen doubles the advantage

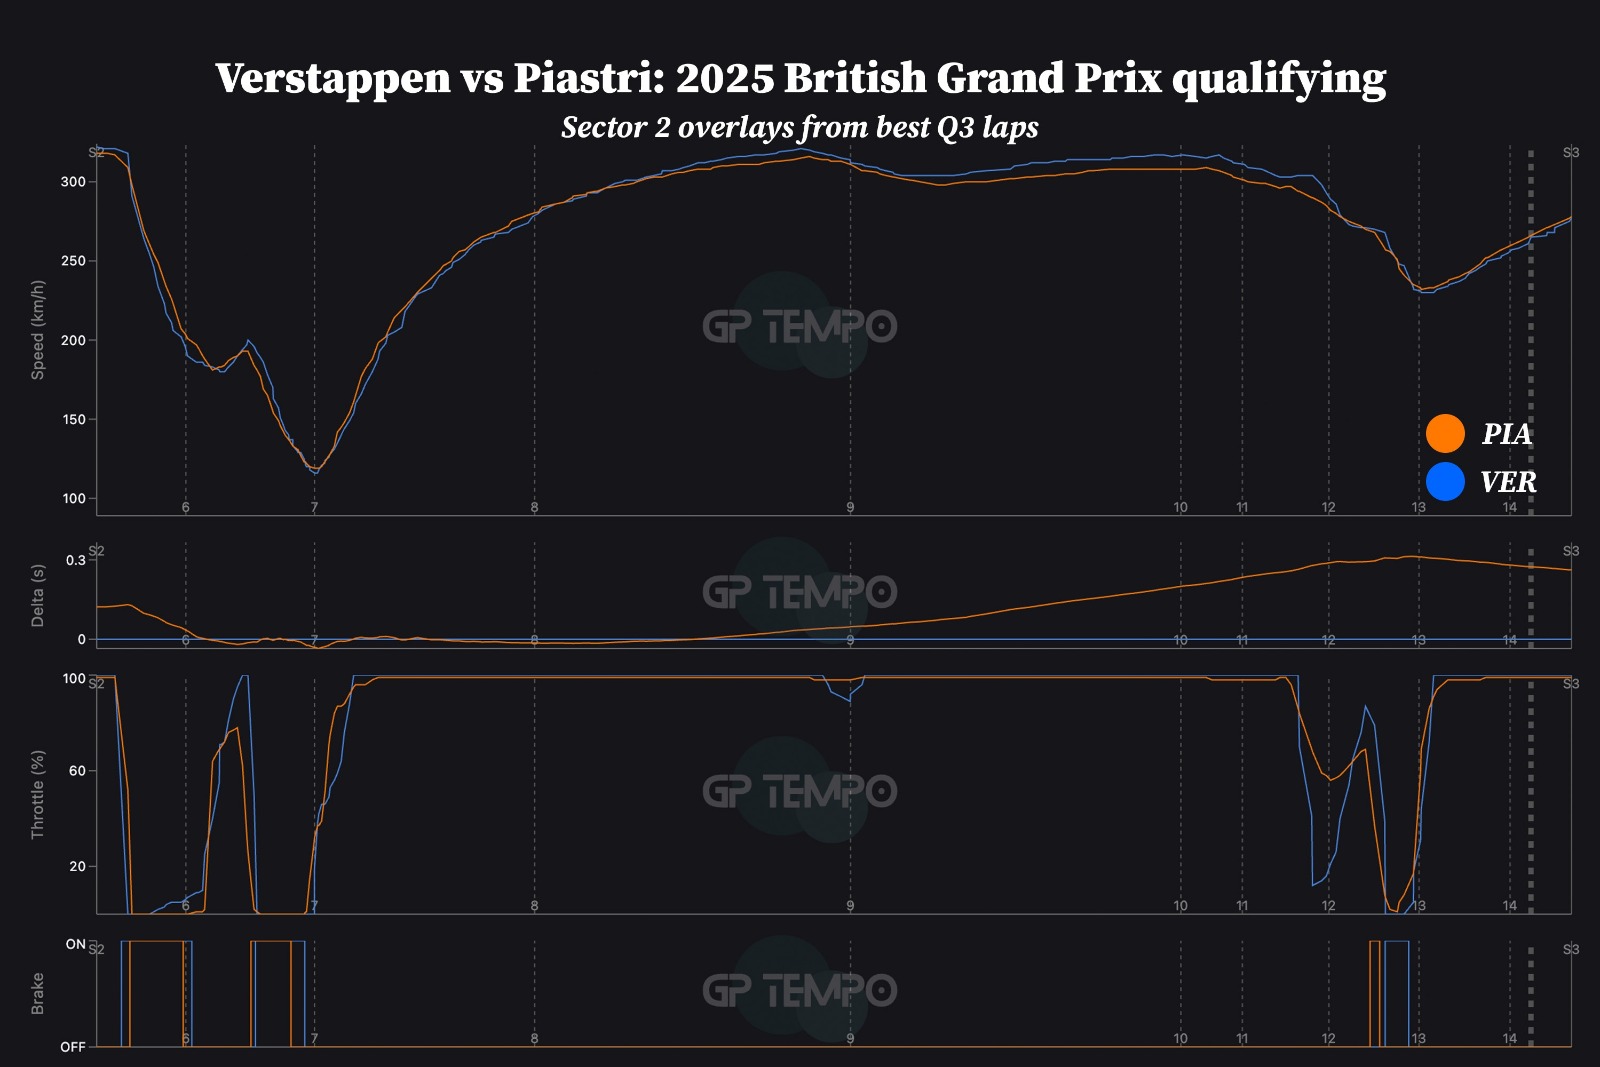
Verstappen continued to build his advantage in the middle segment of the lap
Verstappen’s set-up was less conducive to a good run through Brooklands and Luffield. He carried about 10km/h less through the Brooklands left-hander, and had to wind on about 10% throttle just to maintain the speed and keep the rear-end holding. Next, he briefly booted the throttle to its extremities before lifting on the Luffield transition, but had to brake for longer to keep the car in check before rolling out of the corner for Woodcote.
Thanks to the McLaren’s greater rear-end downforce, Piastri was up to speed a bit quicker out of Luffield and even had a 0.015s advantage by Verstappen at this point – but Copse was about to significantly change this. Verstappen was again quicker at the tail end of the straight and actually lifted very slightly through the corner. But this cost him nothing; actually, the delta continued to grow in Verstappen’s favour as he carried between 8-9km/h more through Maggotts and Becketts.
The variation in throttle traces and braking are also interesting here. Piastri lifts off less through Maggotts and brakes earlier – but less – for Becketts before the transition to the Hangar Straight. Verstappen only starts his braking when Piastri’s finished with his brief touch of the pedal, braking into the corner to maintain the stability through the final phase.
Piastri is 0.313s down on Verstappen at the apex of Becketts, although the traction out of it brings this down to “only” 0.262s.
Sector 3: Verstappen loses the final-sector battle, but wins the pole war

Superior traction helps Piastri narrow the final gap to Verstappen
Piastri’s deficit rises back up to 0.315s when Verstappen comes to the end of Hangar and manoeuvres into Stowe; the Red Bull driver also feels much more enfranchised to brake later to keep the DRS rolling for longer. But he has to brake for longer, while Piastri was on the throttle sooner (although Verstappen’s up to 100% pedal sooner on the exit) and thus contributed to a smaller 0.24s delta here.
Verstappen brings that back up with a later-braking run into Vale/Club, but Piastri’s got the traction to end of the lap to surpass the four-time champion here. This is the leading contributor to the gap falling down to 0.103s at the line, as Verstappen simply traverses the final corners at a slower rate of knots.
Still, it wasn’t enough to deter Verstappen, who’d done the hard yards in the earlier part of the lap.
Piastri’s final lap slip: how much did it cost?
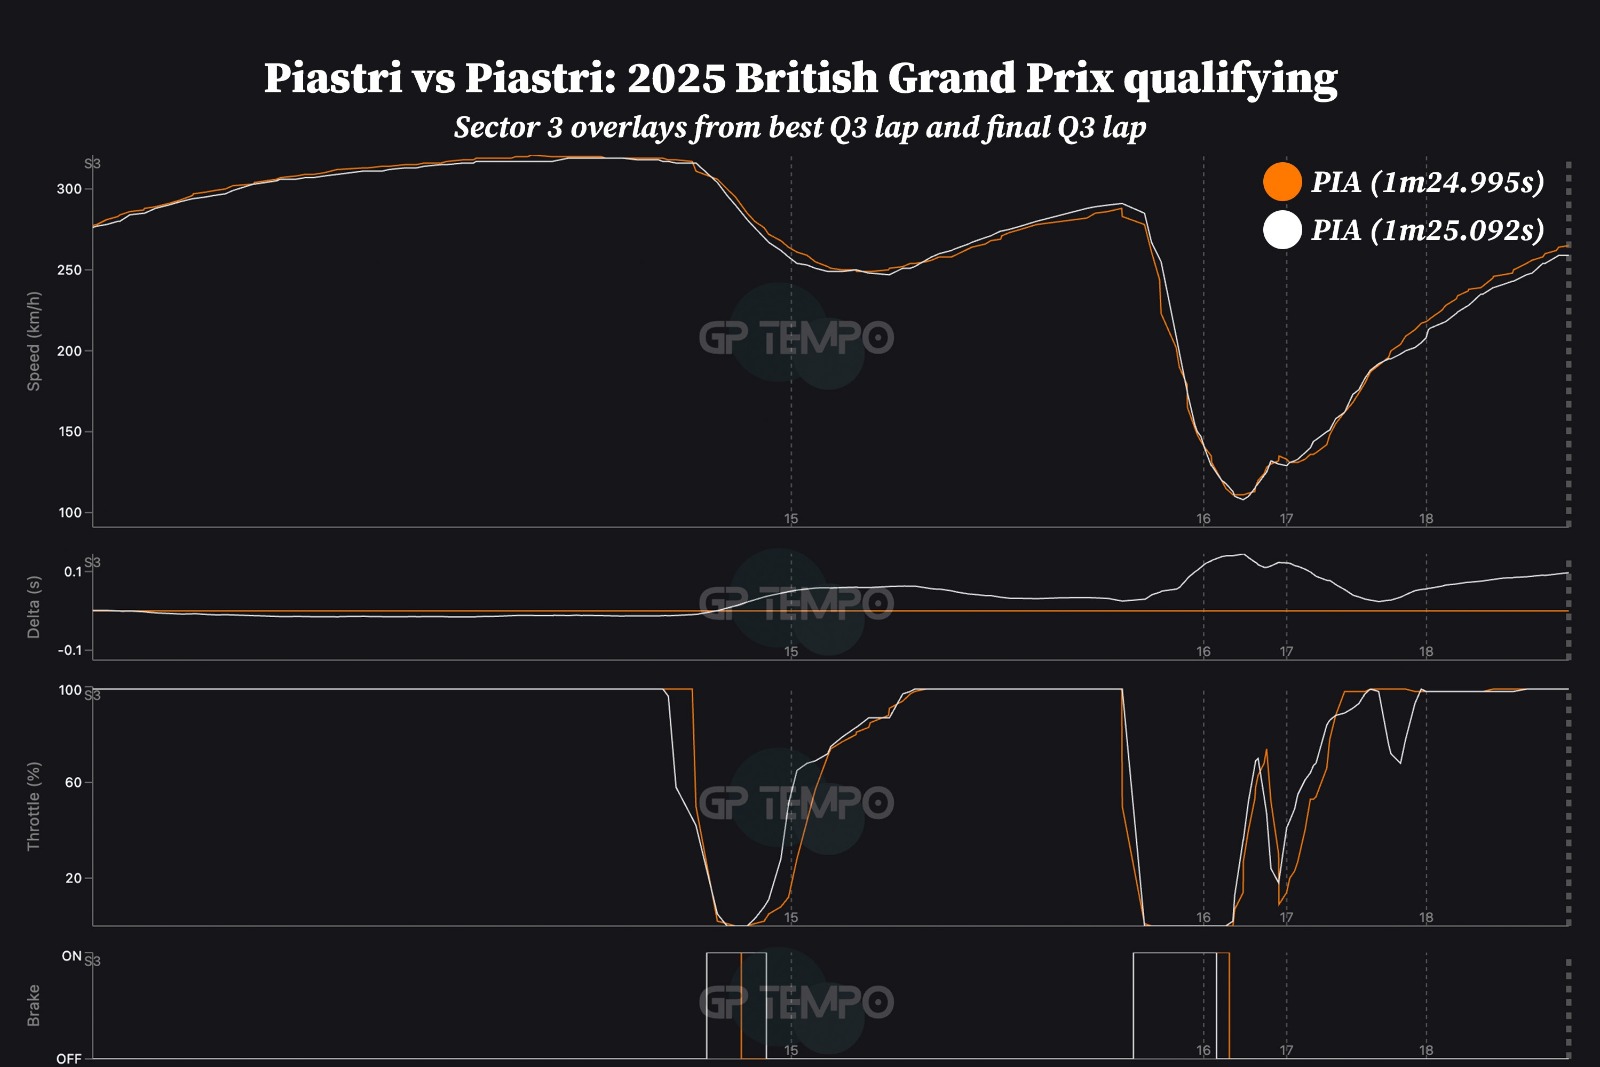
McLaren driver had been on course to improve before late wobble on final run
On his final lap of Q3 (white), Piastri was actually up on his previous run (albeit by about 0.01s) before losing time through Stowe through staying on the brakes longer. His braking point was identical at that point, but he’d also lifted off sooner in the meantime and the combination of the marginally different inputs put the lap-on-lap depreciation to 0.06s by that point.
Piastri then took a faster approach into Vale and Club and tried to carry the speed through a part of the circuit where he was strong; the GPS delta also suggests he took a slightly wider line in an effort to open up the corner.
Then his McLaren washed out through Club, prompting a 30% lift off the throttle. Given Piastri was just 0.03s off his best moments before this point, it suggests that the final margin would have been close between his two laps, although his delta had been falling.
In any case, even if Club had gone perfectly and the delta continued to drop rather than rise thanks to the slide, Piastri wouldn’t have found the time needed to nullify Verstappen’s later lap. The damage had already been done in Stowe.
Hamilton pole effort comes to no a-Vale?

Ferrari driver Hamilton could’ve been right in the mix without his slight final-corner woes
After Hamilton punched in his opening sector, it looked like the Briton might make a surprise bid for pole; in truth, Ferrari never had the straightline speed needed to topple the Red Bulls; Copse, and Maggotts/Becketts contributed to most of the nine-time British GP winner’s deficit.
But his assertion that his minor slip at Vale “probably cost me second” on the grid was pretty much spot on; he lost time by perhaps playing too much with the throttle on the entry of the corner and lost the momentum here.
That being said, Piastri’s initial approach to Club on his final tour was impressive; although Hamilton felt he’d lost a tenth with his minor mistake, this would merely put him on par with Piastri overall. We’ve said this a zillion times this year, but the margins are tight…
In this article
Jake Boxall-Legge
Formula 1
Max Verstappen
Oscar Piastri
Red Bull Racing
McLaren
Be the first to know and subscribe for real-time news email updates on these topics
Subscribe to news alerts
Read the full article here


