


On his final lap of Q3 at Formula 1’s Mexico Grand Prix, Lando Norris ripped almost six-tenths of a second out of his previous best.
Of course, track evolution – a continual source of free lap time around the Autodromo Hermanos Rodriguez – played its part in facilitating the colossal advances in pace, but Norris also earned plaudits for his lap.
It’s not been easy to pull qualifying times out of the McLaren of late, but Norris got into it to deliver a crucial result for his own championship chances.
But those plaudits must be shared with Charles Leclerc, who was similarly exemplary behind the wheel of his Ferrari.
Leclerc had made Norris work hard after the first laps had been laid down, setting a 1m15.991s to find over eight tenths over his best from Q2, but the McLaren driver simply found more progression through the final stage of qualifying to set the line-leading 1m15.586s pole lap, while Leclerc topped out with a 1m15.848s.
That said, the data shows that both drivers were incredibly close on their best laps, up until the two cars reached the Foro Sol stadium (now officially called the Estadio GNP Seguros, for those who like brand names).
It was in the arena that Norris knocked Leclerc for six, as he picked his way through the slow-speed corners and gathered the exit through the semi-Peraltada, now named after Nigel Mansell for that move on Gerhard Berger in 1990.
Here’s how Norris dug out a pole position start over Leclerc.
Sector 1: Norris finds tiny margin with Turn 3 exit
At the first-sector timing point, Norris and Leclerc were split by just 0.029s – and almost all of that comes courtesy of Norris’ exit through Turn 3. Both cars rode the kerbs well in the opening trio of corners, taking a few liberties thanks to the wider white lines that allow the drivers to attack the course with a bit more gusto.
Norris got on the brakes for Turn 1 sooner than Leclerc; Ferrari has found much more confidence under braking of late, and it allowed the Monegasque to carry a bit more speed into the opening complex.
Out of Turn 1, Leclerc is two tenths up on Norris, but there’s a caveat to braking later into the corners: the driver needs to apply more steering lock to bring the car to the outside and minimise the cornering for Turns 2 and 3.
With more braking for the first corner, Norris didn’t need to pull as much speed out of the car for the second two parts of the three-stage opener. Thus, his second stab on the brakes was shorter, and he slowly built up the pressure on the throttle before taking it to the end of its travel out of the corner.
This was evident in their differing lines. Norris had done more of the work through the corners and thus could keep the steering more open on the exit of Turn 3, while Leclerc had to apply more lock to ensure his Ferrari could keep clear of the outside kerb. With more momentum, Norris claimed a small early advantage.
Sector 2: Leclerc aggressive through Turns 4-5-6, but Norris reclaims time through Esses

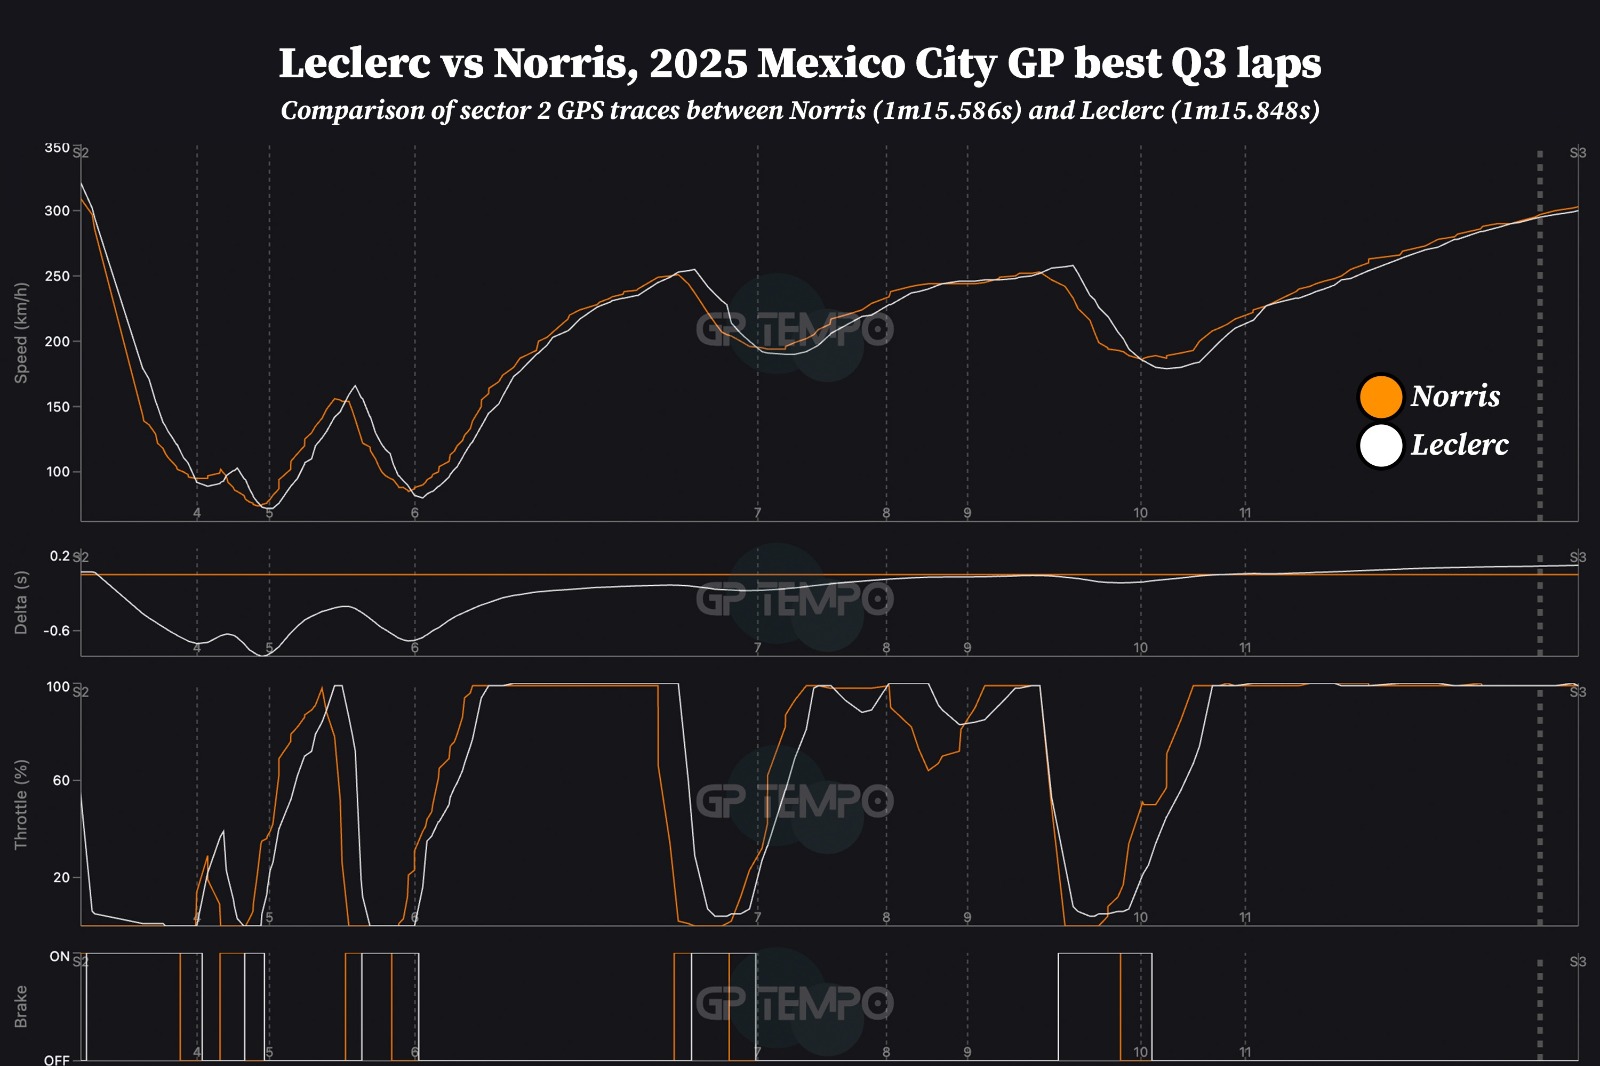
As can be seen from both sector traces, Norris is already braking for Turn 4 before the split line on-track – Leclerc delays his braking point to afterwards. This brings the drivers slightly out of phase, and so Leclerc looks like he gains a massive chunk of time through the upper part of the circuit.
In reality, this isn’t quite true – it’s more down to the positioning of the car and the differing line Leclerc takes through the double-right 5/6 corners. The Ferrari driver likes to hug the line through those corners, which denotes his more aggressive approach and strong compliance in the SF-25 – once the cars settle into phase again, Leclerc actually finds over a tenth on Norris by the exit and approach to Turn 7.
Again, Norris likes to brake earlier but for a shorter duration – as we’ve said all season, the MCL39 tends to work best when the drivers are more passive into the corner, let the rear settle, and then bolt on the accelerator. This means that Norris spools up more quickly through the Esses section and recaptures the momentary time loss.
Both drivers balanced the kerbs nicely through the series of sweepers, but Norris is earlier to the throttle pedal out of Turn 10, and this snowballs into a one-tenth advantage in the prelude to the final sector.
Sector 3: Norris doubles his advantage with approach to Turn 14

As the pattern has shown at this point, Norris hits the brakes earlier for Turn 12 to ensure he’s able to round off the 90-right into the stadium without taking too much exit kerb. The stadium is all about getting the lines right here and, again, Norris and Leclerc take slightly different approaches.
Leclerc’s later on the brakes for Turn 12 by comparison, but their brake points for the in-stadium Turn 13 are very similar.
Here, Leclerc takes the opportunity to swing his car into the tight left and uses up more of the kerb with the intent of creating a straighter line into the fiddly Turns 14-15-16 (one of which isn’t a real corner). Norris takes less kerb here, instead choosing to attack Turn 14 a bit more to get on the anchors sooner for the last braking zone of the circuit.
It’s here where Norris’ advantage begins hit its peak, allowing more speed to be carried through the final set of corners to round off the lap. He gets on the throttle earlier for the final run to the start-finish line – and that final flourish of momentum capped off a much-needed pole position.
Still, pole isn’t a huge benefit in Mexico – Leclerc might actually prefer having a tow off the McLaren on the run to the first corner, but Norris can somewhat dictate how the opening flurry of activity goes as he picks a side off the line. Cover Leclerc, or cover Hamilton? That’s the debate.

Like Norris, Leclerc dazzled in qualifying in Mexico
Photo by: Zak Mauger / LAT Images via Getty Images
We want to hear from you!
Let us know what you would like to see from us in the future.
Take our survey
– The Autosport.com Team
Read the full article here


